Melissa Kaylene: guest posts
Image Map
Showing posts with label guest posts. Show all posts

Monday, December 28, 2015

Pulling Off a Christmas Feast at the Last Minute

pulling off a Christmas Feast at the last minute

Pulling Off a Christmas Feast at the Last Minute
Maybe plans fell through and now you’re sitting with your head in your hands, praying for a Christmas miracle. If you just found out you’re in charge of this year’s Christmas feast—for whatever reason—don’t panic. Okay, panic a little! Is it out of your system? Good. Now it’s time to get down to business. Contrary to what you’re probably thinking, it is actually possible to pull off a delicious feast with limited time—it just takes a bit of foresight and a lot of patience. Follow these tips and throw a dinner party your loved ones will enjoy to the fullest this Yuletide season.

Tuesday, June 24, 2014

Guest Post: 8 Top Tips For Meaningful Bedroom Decor

Hey everyone! Today I have a fun guest post from Alice who writes the blog for her aunt's store, The YorkShire Linen Company. She's sharing tips to create more meaningful bedroom decor, and I love all of her ideas! Alice is also going to be creating her own personal blog soon, so we'll be able to check out even more of her writing! In the mean time you can connect with Alice on her Facebook Account. If you'd like to learn more about guest posting, click HERE.
                                                        
Hi my name is Alice and I am glad to be guest posting here today! I am a blogger with the vision to do home decor for everyone. Say hello to me HERE 

8 Top Tips for Meaningful Bedroom Decor (Bedspreads & more)

Have you ever wondered why some interiors look fantastic; welcoming, cozy and attractive, while others that are superficially similar just do not work? The main difference, you may be surprised to learn, has nothing to do with the quality or expense of the decor, but rather the meaning, or import behind the design. This is why some homes look absolutely lovely and yet are lacking in that sense of intimacy that makes a room decor successful. Here is how to make sure your decor is both beautiful and meaningful, especially in the bedroom.

8 Top Tips for Meaningful Bedroom Decor
Source
Be Passionate
If you are not interested in decor and do not really care about what your bedroom looks like, this will show in the finished room. Do not worry if you have never decorated a room before, but do make sure that you have strong feelings and ideas about what you want the decor to portray. Do you like cool elegance or warm vibrant colors? Are you a neat-freak, needing smooth uncluttered surfaces or do you prefer a more lived-in room? Plan out your bedroom on paper and in your head, drumming up enthusiasm for the task ahead before putting any of it into action.

8 Top Tips for Meaningful Bedroom Decor
Source
Put In the Necessary Effort
Do not be tempted to race through the job as this can result in poorly applied wallpaper or streaked paint. Rather, think ahead to the finished decor and imagine it as you would like it to look then, rather than racing to get it all done too quickly. Take your time over the decor task, slowly purchasing all the products you will need before you start, and then working your way slowly and steadily through all the tasks on your to-do list.

8 Top Tips for Meaningful Bedroom Decor
Source
Tweak Where Necessary
Once the job is done, look around with a critical eye and allow yourself some leeway to make changes to anything that does not look as you imagined it would. Flexibility is a key trait that we all need at some stage during our lives and learning to embrace it makes our lives very much easier. Having said that, do not continue to change and fiddle with the decor: try once or twice and then perhaps decide to accept that you may not ever achieve the exact effect that you are aiming for.

8 Top Tips for Meaningful Bedroom Decor
Source
Fantastic Furniture
Although costly furniture is not necessary, buying the best quality bedroom set that you can afford is the best policy. Better quality furniture will look good and last for a longer time than poorer quality pieces. Do shop around though and make sure you pay the lowest price for the best quality pieces.

8 Top Tips for Meaningful Bedroom Decor
Source
Beautiful Bedspreads
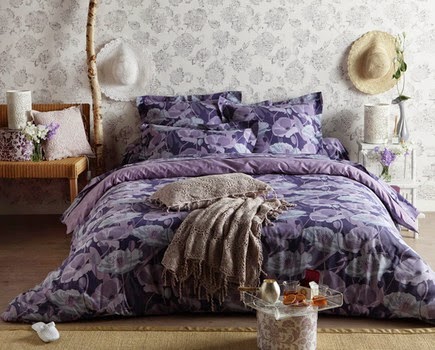
Choose your bedding with care and attention. Not only will you be forced into contact with the bedding every night but the bedding will go a long way to setting the whole tone of the bedroom. There is an immense array of bedding fabrics, styles and patterns on the market today and some research should help you to find the perfect bedspread to complete your chosen decor style. I have a strong thing for colorful bedspreads in Summers and Yorkshire Linen is a good option for getting them.

8 Top Tips for Meaningful Bedroom Decor
Source
8 Top Tips for Meaningful Bedroom Decor
Source
 Lovely Light
Good lighting is essential in any room. Poor lighting detracts from the decor as people are simply unable to see it clearly enough to appreciate it! Choose attractive light fittings and make sure that you put in relatively high wattage bulbs. Lamp & Light has fabulous glowing bedroom lights.

8 Top Tips for Meaningful Bedroom Decor
Source
The Whole Picture
Look at the room as a whole to see what is lacking and to pick out any jarring notes in the decor. It can be all too easy to want certain things in the bedroom, for perhaps sentimental reasons, but if these items (it could be a picture, statue or even an old chair) upset the smooth flow of the decor you may be better of keeping it in another room.

8 Top Tips for Meaningful Bedroom Decor
Source
Finish It Off
Make sure that you complete the entire bedroom. As mentioned above, you may need to work on your bedroom over time, but do give yourself a timetable for having the room completely finished. As a final touch, having checked the overall ambiance and feel of the room, make sure that there are no obtrusive spaces in the room, areas where there is something lacking. Fill these spaces with accessories, soft furnishings or even soft toys: whatever will please you!

Wednesday, October 2, 2013

Fall Crafts for Kids

Today I have a guest post from Studio One Contributor Caitlin Boyle. If you are interested in guest posting or other forms of advertising on my blog please visit my media page HERE, and feel free to email me @ melissakaylene.gmail.com


Ideas That Spark: Mom2Mom

Fall Crafts for Kids

By Caitlin Boyle for Ideas That Spark


Get the entire family in the seasonal spirit with these simple craft ideas for fall. Together, you’ll create beautiful decorations to display and treasure for many autumns to come.

Autumn Trees: For this project, you’ll need white construction paper, non-toxic finger paint in a variety of fall foliage colors, several paper plates, and a brown marker. Squirt one color of paint in the center of each paper plate. Use the brown marker to draw a tree trunk on the paper, and then add ‘leaves’ by dipping your hands in the paint and pressing them onto the paper.

Pumpkin Art: Paint stripes, stars, and swirls on pumpkins. After the paint dries, use a black permanent marker to color in a cheerful (or scary!) face, your child’s name, or the first initial of your family’s last name.

Acorn Art: Your children will love collecting fallen acorns! After gathering the nuts, you’ll want to de-bug and dry the acorns before using them in crafts. To clean the nuts, soak in water for an hour, spread out on a cookie sheet, and bake for 20 minutes at 350 degrees (stirring once). Check the nuts regularly to ensure they don’t burn. Let cool completely. Hot-glue the acorns onto picture frames, wreaths, or baskets.

Pumpkin Plates: Paint six to eight paper plates orange. Depending upon your child’s age, you can either provide a variety of eyes, nose, and mouth shapes cut from black construction paper or they can design and cut their own. Once the paint dries, select and glue down the eyes, nose, and mouth shapes. String the plates together vertically to create a beautiful door decoration.

Pine Cones Décor: Like acorns, children love collecting pine cones, which can be placed in baskets or glass jars to decorate entryways, tables, and fireplaces. To de-bug and open pine cones, bake at 200 degrees for 30 minutes; like acorns, be sure to regularly check the pine cones to ensure they don’t burn.

Scented Pomanders: Pomanders are clove-studded fruits displayed in glass dishes or hung off mantels with pretty ribbon. This decoration is not only fun to make; pomanders also release an earthy, spicy scent. To make a pomander, use a wooden skewer to press whole cloves into the skin of a citrus fruit (grapefruit or orange works best). Covering the entire fruit with cloves keeps the pomander fresh for longer.


Monday, September 23, 2013

York Photo Trick-or-Treat Bags


As many of you know by now, I'm kind of completely obsessed with photographing my kid's life and adventures as they grow up and in our digital lives now, its so easy to do. One of the greatest things are online photo companies that allow you to use your limitless creativity to create albums, gifts, décor, and more all simply through a few uploads and option clicks.
 
York Photo is a company that does just that. They have been around for a long time and have had millions of satisfied customers. They offer a free secure unlimited photo storage area,  and over 100 different products that they can create with your images.
 
Right now York Photo is offering a Halloween Special for new customers. You can design your own Trick-or-Treat bag for your favorite goblin and its FREE with shipping as low as $3.99. PLUS new customers also receive 40 complimentary photo prints as well.
 
I think my kids will absolutely love having a personalized bag to take with them and fill with all their loot, and knowing my kids they will reuse it for all sorts of different things! Just use code TRICKTREAT when you order. Enjoy!


~Melissa

Saturday, August 10, 2013

Monday, August 5, 2013

Guest Post // Tips to Creating the Perfect Cupcakes


Welcome! Today I have a guest post for all my cupcake lovers out there, as well as all of my readers who live in Australia! Little Bertha is a company that
bakes fresh, daily and to order, for café customers, corporate catering or direct at home.
They offer a range of handmade cakes and thanks to Melbourne's world renowned café culture boasting high quality boutique coffee houses, the number of their stock lists continues to grow, fast. They will  even bring Little Bertha to your home for big or little kids parties.
Their treats look so delicious If only they delivered to Oregon! :)
They are sharing some wonderful cupcake making tips today.
 
If you are interested in guest posting on Willamette Valley Wonder Woman check out my media kit. I love to work with other bloggers and small businesses!
 
~Melissa 


Tips on Baking Cupcakes
 
Cupcakes are both one of the easiest and hardest cakes to make. They're cute and tasty, but can easily become dry if overcooked and they don't last very long if not stored properly. They can also be time consuming to decorate as you have to decorate multiple individual cakes instead of one large one, but you can take a simpler approach like the carrot cakes from Little Bertha (pictured above).
 
However, there is a way to make delicious and interesting cupcakes without having to go crazy on the decorations. I think you will 'love' these hidden cupcakes that are perfect for any lovely occasion, anniversaries, Valentine's Day, even birthdays and they are surprisingly easy to make. 
 
Start by making a basic vanilla cake batter, (a packet mix is fine). Once you have whipped that up, separate it into 2 bowls, one with a spout so it's easy to pour. Add red food dye to the bowl with the spout and mix well to get a solid red color.
 
Place 2 tablespoons of vanilla batter (you can make it chocolate if you'd like by adding cocoa) into your lined cupcake tins. Pour the red batter into a flat pan so the batter lies about half an inch thick. Bake the red batter for 15-20 minutes at 180 degrees C (350 F) and allow to cool completely. Once cooled, cut the flat cake into heart shapes with a cookie cutter and place vertically into each cupcake tin. 
 
Add the rest of the cupcake batter to each cupcake, pouring over the hearts and place in the oven for approximately 20 minutes.
 
Once cooked, remove from pan and let cool. Top with some thick, fluffy vanilla frosting and serve to your unsuspecting guest, they will be delighted when they find your little surprise in the center!  
 
This is only one way of jazzing up your cupcakes, you could even change the shape if you'd like depending on the occasion if you have an assortment of small cookie cutters. I'm sure the kids would love hidden butterflies or dinosaurs, perhaps even a star or car.
 
Another simple way for making exciting cupcakes is to mix up the flavors a little bit, like I mentioned before, you can add cocoa to your vanilla batter to make it chocolate, or even split the batter into two vanilla and chocolate halves to create marble cupcakes. Add coconut to vanilla cupcakes with a little lime to create some tangy cupcakes perfect for those warmer months, or make them a little adult by creating cocktail inspire cupcakes with rum, Malibu, or Irish cream. Your options are endless, and if you've got the time its a worthwhile experiment to see what you can create with these tiny cake creations.


Monday, July 22, 2013

Guest Post // Golf Cupcakes

Welcome! Today I have a guest post from Jennifer who is a contributor to shopathome.com. If you are interested in guest posting or holding a giveaway on Willamette Valley Wonder Woman make sure your check out my Media Kit. Currently all who purchase side bar advertising will also have an opportunity to guest post as well.
 ~Melissa
 

Score a hole in one with DIY golf cupcakes
 

By Jennifer Osieczanek, ShopAtHome.com

 
I don’t know about you, but when it comes time to celebrate my husband’s birthday, he’s not forthcoming with party ideas. Sure, he claims he doesn’t like the fuss - but we all know that’s not true.

So, when his b-day rolled around, I decided to take matters into my own hands. Knowing there’s nothing he loves more than golf, I found a way to incorporate the sport into our simple get-together with friends by making super cute (but in a manly way, of course) golf cupcakes. And also knowing there’s nothing I love more than a good deal, I was sure to find valuable coupons on supplies on the ShopAtHome.com grocery page, where you can virtually clip and print coupons on cake mix and more.     

Here’s what you’ll need:

  • Your favorite cake recipe or mix (find a Duncan Hines coupon here)
  • White/vanilla frosting (it must be white)
  • Green food coloring/tint
  • Red food coloring/tint (optional)
  • Yellow food coloring/tint (optional)
  • Fondant
  • Cupcake holders 
  • Toothpicks
  • Cake decorating ball tool
  • Black food-safe marker
  • White nonpareils sprinkles
  • Food safe marker

I made two different batches of cupcakes, but both started with your standard vanilla cake. If you’ve got a favorite recipe, perfect. If that recipe comes from a box - no problem!

Once your cupcakes are baked and cooled, the fun begins.

Using your favorite vanilla or white frosting (chocolate won’t work because, well, golf balls are white), smoothly cover half your cupcakes. Set those cupcakes in the refrigerator to cool because you’ll need the icing to be a bit firm for the next step.

While the white cupcakes are cooling, tint the rest of your frosting green. I prefer gel tints because of the vivid color they produce. Frost your remaining cupcakes with the green. You can cover them with a smooth finish, or, if you have a decorating tip for grass, go to town!

Next, we’ll make flags. You can usually pick up fondant at your local grocery or craft store. (HobbyLobby, Michaels and Wilton.) You don’t need much for this project, so get a small box if you don’t regularly use the icing. Choose white if you want to tint it yourself, or grab a primary color pack if you’re in a hurry. If you choose white, again, I recommend using the gel tint. I used yellow and red to pop against the green frosting.

Roll out your colored fondant to about 1/8th of an inch thick, then simply cut out small rectangles. Wrap one edge of the fondant around a toothpick to make a flag. Using the food-safe marker, you can write numbers on the flag -- 1 through 18 to represent holes on a golf course or go with the age of the honoree. Then stick the toothpick into your green cupcakes and you’ve got a putting green. The finishing touch for these cakes is to place one white nonpareils sprinkle near the flag to represent a golf ball. How close? Depends on how good the golfers you know are!

By now, your white cupcakes should be well chilled and the frosting somewhat stiff. This next step does require some patience, but it produces some cute cakes. Using a decorating ball tool, create indents in the frosting. Start in the center and make rings of “dimples” until you reach the edge of the cupcakes. You may need to periodically re-chill the cupcakes if the frosting is too soft, but once you’re done, you’ll have cupcakes that look like golf balls.

Now, just wrap up a fun golf gift and all that’s left to do, as they say in the world of clubs and tees, is slice!


Jennifer Osieczanek is a contributor to ShopAtHome.com.

Photo Credit: Jennifer Osieczanek

Monday, July 15, 2013

Guest Post and a Giveaway!


Welcome! Today I have a guest post from Mrs. T.! She is a fellow blogger and Etsy shop owner. She is sharing one of her family's recipes, as well as giving away a set of recipe cards! If you are interested in guest posting or holding a giveaway on Willamette Valley Wonder Woman make sure your check out my Media Kit. Currently all who purchase side bar advertising will also have an opportunity to guest post as well.
 
~Melissa


Grandmas home cooked meals

In this day and age it is hard to sit down as a family and eat together let alone find time to make a home cooked meal.

When I got married my mother and sister came up with a wonderful idea to share with me all the home cooked meals all of us had growing up. Shower guests were asked to fill out a recipe card with their favorite home cooked meal and bring it with them to the shower. This enabled me to start a recipe collection of my very own home cooked meals.

I was given recipes from aunts with a side note that expressed that it was my cousins or uncles favorite meal, my grandma’s famous sauce, my grandma’s famous chicken and rice, my moms and sisters all-time favorites among many others.
 
As time has gone on since I've been married I've attempted to make quite a few recipes from my selection. One meal has stood out that granted me much needed comfort one day. I needed something that would settle nicely in my stomach but yet with a ton of flavor. (If you read THIS POST , it will start to explain why I needed such a food). What else would one choose other than one of Grandma’s or moms famous comfort food?!?!?!?

Grandma T’s Chicken n’ Rice

1 cup brown rice

1 can chicken broth (14.5 oz)
1 can Cream of Chicken (10 ¾ oz)
Dash of garlic powder
½ a stick of butter (optional!)
3 Chicken Breasts
1.) Mix all ingredients and pour into 9x13 baking dish
 
2.) Dip chicken breast in milk and coat with equal parts of seasoned bread crumbs and Parmesan cheese. Pat crumbs into chicken breast with hands
 
3.) Lay coated chicken on top of rice mixture
 
4.) Bake covered at 350 degrees for 50 minutes. Take off cover sprinkle with paprika and bake for another 10 minutes.
 
My Grandmother swears by the added butter in the mixture, however, I did not put it in and my meal turned out perfect!
 
This meal not only gave me the much needed comfort I needed that day it enabled my hubby and I to sit down to a home cooked meal, a first time in a long time.
 
I would like for you to join me in a special giveaway. I will be giving away a set of 25 recipe cards to help you compile your collection of home cooked meals.
The winner will have his/her choice between either my Italian themed recipe cards or flower themed recipe cards:
 
~Mrs. T
 
a Rafflecopter giveaway


Mrs T. is a fellow blogger @ My FrontPorch 
and Mrs. T’s Front Porch: an etsy shop