Melissa Kaylene: crafts
Image Map
Showing posts with label crafts. Show all posts

Friday, January 15, 2016

How to Make 3D Glitter Snowflakes

Compensation provided by Snack Pack® via Mode Media
How to make 3D Glitter Snowflakes #Spoonfuloffun AD

Just because school is back in session and the holiday break is behind us (can you believe it’s been a month already?), it doesn’t mean that you can’t still celebrate winter.

We are heading up to play in the snow on Monday for Emma’s birthday, so I thought it would be fun to get in the spirit and create some glittery 3D snowflake decorations. Even though Emma chose a snow trip over a party this year, I still like to make her big day special and make the house pretty and have some tasty treats to eat on her big day.

Friday, March 27, 2015

Easy Easter Bunny Cards

Easy Easter Bunny Cards

A few years ago I used to be so on top of cards. Making them, sending them; from Christmas to Easter to thank you cards – I did a pretty good job.

Then somewhere along the way things have gotten busier and busier and I don’t take the time to make them like I used to with the kids, and that makes me sad. I don’t want to be so busy that I forget to teach the kids the importance of letting other’s know that you are thinking of them – and my kids are such little artists; they enjoy creating and sharing what they do.

So, since it was spring break this week, and we were having a stay-cation, I helped them make their own Easter bunny cards to share with our family. They were so easy to make and it gave the kids the freedom to decorate them however they wanted, so it worked out perfectly.

Easy Easter Bunny Cards

Here’s what you need:

White paint
A variety of paints and markers
Sponges and paint brushes

Fold the construction paper into fourths, creating your card.
Then carefully paint your child’s palm, middle, and ring finger with white paint.
Next, spread their two fingers apart, firmly place onto the construction paper.
Repaint for each print until you have the desired number of cards.
Let them dry completely.
Then, allow your kids (or yourself!) to create their own unique Easter bunnies!

Easy Easter Bunny Cards


Now that we finally have the cards all finished I just have to physically put them into the mail! Guess I’d better get on that since Easter isn't very far away!

~Melissa

Tuesday, August 19, 2014

Some Summer Craft Memories

#crafterscrate summer craft ideas

If you know me you know how excited I get when I receive fun things in the mail. Ever since I was a kid I've been thrilled to get mail. When I was young I  would write pen pals from all around the world, just to get letters filled with stickers and clippings from magazines. I think it's just like a little surprise or present. It's something little that makes my day a little happier. 

Now that I've been blogging for a couple of years, I'll often get sweet gifts and products in the mail. They make me smile every time I open one. 

Especially this one.

#crafterscrate summer craft ideas

It's a box from Crafters Crate. Crafters Crate is a monthly craft subscription box for your kids - it's kind of like getting a magazine every month, but instead you get an adorable package with four different crafts you can make with your kids - one from each category every month: 


1. A craft focused on food, cooking or nutrition 
2. A wearable craft. (Bracelets, necklace and rings)
3. STEM focused activity. (Science, Technology, Engineering and Math)
4. Skills craft.  (Learn new crafting skills)


#crafterscrate summer craft ideas

Last week Emma and I sat down on the deck and finally opened up our box and decided to make our crafts together. She loved making a lei necklace all by herself, and I helped her bling out her favorite pair of flip flops. 

#crafterscrate summer craft ideas

Anika then came over and helped Emma out, making the summer weaving craft. She loved all of the bright colors. 

#crafterscrate summer craft ideas

The girls and I had a lot of fun sitting down for an hour and creating these special projects together. It's great to have everything together in one spot with easy directions for you to work on. I think it would be worth every penny given the fact on how many memories you can create. 

Crafters Crate is also generously offering a discount to all of you! If you enter the code WONDER you will receive $10 off your subscription! 

#crafterscrate summer craft ideas

Adorable crafts, memories to make, and a fun surprise in the mail? The girls are already asking me when the next box will come. :)

~Melissa
I was given a free Crafters Crate box to review, no other compensation was received. To find out more information on working with me or to contact me, visit my sponsorship page HERE.

Monday, June 16, 2014

Cute Bridal Shower Gift Idea with My M&M's

“I participated in an Ambassador Program on behalf ofMillennial Central for MY M&M'S. I received product samples to facilitate my review and to thank me for my participation.”
My M&M bridal shower gift idea #mc #sponsored #ambassador

A couple of weeks ago I shared that one of my good friends is getting married this summer and how I was going to do a little something special for her prior to her big day. I decided to get her some personalized My aM&M's for gifts to give at a shower that I will be holding for her. I had never ordered personalized M&M's so I wasn't quite sure what to expect - but I think they turned out great!

My M&M bridal shower gift idea #mc #sponsored #ambassador

They give you plenty of options for customizing your order, including three different color choices and wording, clipart - even a photo option which I thought was really fun! 

My M&M bridal shower gift idea #mc #sponsored #ambassador

Since my friend is a country girl at heart and love all things camouflage and pink camouflage, I decided to get her My M&M's in white, pink, and dark pink. They arrived in a handy insulated bag with ice packs and even though I know how many pounds I ordered, it sure seemed like more when carried in the box! When I opened it to take a peek at them I couldn't help but eat a couple (handfuls that is!) and had to stop myself from eating way more than I should!

My M&M bridal shower gift idea #mc #sponsored #ambassador

What I did was purchase little clear plastic bags to place the treats in, and they even sent me a very handy scoop to divvy them out with - each bag got three scoops. I had tried to find pink camouflage ribbon but didn't have any luck, so I improvised with pink ribbon along with traditional camouflage ribbon. 

My M&M bridal shower gift idea #mc #sponsored #ambassador

I always love creating little gifts and favors for people and I think that when we do have the bridal shower these will be a bit hit! I just have to figure out where to hide them from the kids (and myself!) before then.

My M&M bridal shower gift idea #mc #sponsored #ambassador
  
Have you ever hosted a bridal shower before? This will be the first time for me… and I’m fairly certain it will be an intimate casual party filled. Do you have any tips to share?

 ~Melissa

Monday, May 5, 2014

Playing Pretend

Willamette Valley Wonder Woman // #PretendWear @melissakaylene

Last week we had a little coloring fun with markers, paints and outfits that Pretend Wear sent us to try out. The play clothes can be washed and recolored again, letting the kids create colorful creations multiple times. Emma and Noah had a blast. They were SO excited to try on their wearable artwork, and we had a lot of fun spending time together... and finished our painting right before the rain arrived. :)

~Melissa 
I was given free product but was in no way compensated for this post. All opinions are of my own. 

Wednesday, February 12, 2014

Easy D.I.Y. Valentine Cards

Easy DIY Valentine Cards

Hello to all of the last minute crafters out there! Don't tell me I'm the only one, right? I know it would be so much simpler to go and buy a few boxes of Valentine cards for the kids to take to their class parties, but I guess I just have to do things the hard way around here. The past couple of days (okay and mostly this evening) Anika and I were busily creating 66 of these little hearts for three different classrooms.

Easy DIY Valentine Cards

I had actually purchased this red glittery wrapping paper from Costco a couple of years ago during the holidays and have never used it all up...and then while I was putting Christmas stuff away it dawned on me; Valentine Hearts. Of Course! 

Easy DIY Valentine Cards

The Kraft paper was also a score from the Target clearance section. I think it was like 3 rolls for $3.00 or some sort of offer like that I couldn't refuse...and I seem to have this thing for polk-a-dots.

Easy DIY Valentine Cards

So here's what you need:

  1. Photo Paper. I used HP Photo 5X7 photo cards
  2. Glue Dots, or a Glue Stick
  3. Kraft Paper
  4. Red (preferably glittery!) Wrapping paper or scrapbook paper
  5. scissors and /or a fancy dancy paper cutter
  6. Black Washi Tape (optional)
  7. White Chalk Marker (optional)

Easy DIY Valentine Cards

First I created a heart template and folded it in half. I then traced the half hearts onto the back of the glitter paper. I created a whole row and then cut them out. The great thing about this wrapping paper is that its got the grid on the back and it makes it so much easier to fold and align things.

Easy DIY Valentine Cards

I then took my photo cards and folded then in half, then cut each card into two pieces. You could use a card stock instead if you want, I just had the photo cards on hand already, and then were a great size for the least amount of cutting possible. :)

Easy DIY Valentine Cards

I then measured and cut the craft paper to fit just inside the photo paper, then using glue dots I attached everything together. We did end up running out of the glue dots so we switched to a glue stick and that worked just fine.

Easy DIY Valentine Cards

When I glued the hearts, I just glued along the folded line, leaving the edges free to create more of a three dimensional look. This also came in really handy because we bought a big bag of Sweetarts and you can staple the candy to the back of the card and put the staple underneath the side of the heart... so you don't even see the staple. Anika thought this was "such a great idea Mom!"  Sometimes my brain still works. :)

Easy DIY Valentine Cards

So where does the Washi Tape and chalk marker come in? Unfortunately I didn't get pictures of them finished with candy and labeled, but what we did after we stapled the candy off to one side of the back was cut two Washi tape strips and stick them on to the back of the card and then Anika used the chalk marker to write To and From names. It actually turned out really cute!

Easy DIY Valentine Cards

And that's our crazy last minute D.I.Y. Valentine cards!

~Melissa

Sunday, November 24, 2013

"Extra" Special Gift Wrap With Gum

I am a member of the Collective Bias® Social Fabric® Community. This shop has been compensated as part of a social shopper insights study for Collective Bias and it's advertiser. #GiveExtraGum #Shop
 
#shop
 
I love gifts that go a little above and beyond and have a little Extra personal touch to them. I wanted to do something like that this year for some of my loved ones, but I wasn't quite sure what to do. I've painted packages, added little ornaments, pretty bows and ribbons, but then one idea dawned on me when I was in the isle at Walmart one afternoon.
 
Gum.
 
Yup. Extra gum.
 
#shop
 
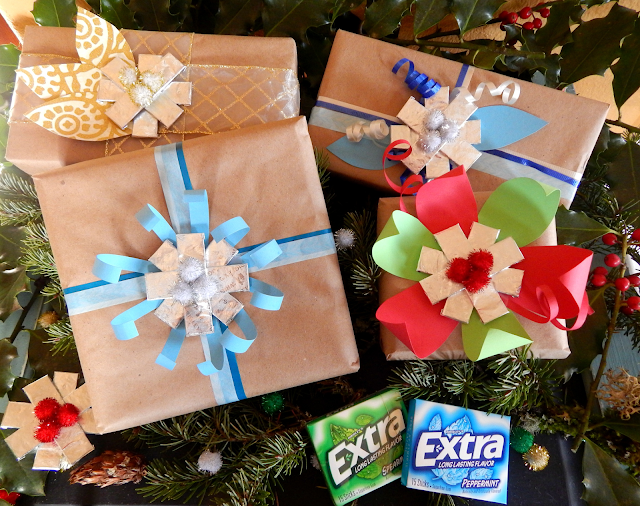
What about making little snow flowers out of them? It's affordable, really quick and easy, and creative.  My kids (who absolutely love chewing gum) thought the idea was fabulous and had so much fun helping me decorate some presents.
 
#shop
#shop
 
These really are so simple to make and make a great statement.
 
#shop
#shop
 
What You Need:
 
1 package of Extra sugar free gum (makes three snow flowers)
 
Glue Dots
 
Pom Poms
 
Washi Tape
 
Curling Ribbon
 
Assortment of scrapbook paper
 
Kraft Wrapping Paper
 
Anything else you'd like to decorate with!
 
#shop
 
 1. Carefully attach a glue dot on the back side of the gum, sealing the wrapper together.
 
2. Attach to second stick of gum
 
3. Continue to add glue dots and gum sticks until all five sticks are stuck together
 
4. Using glue dots attach pom poms to top of the snow flower and
 
Viola!

#shop
 
After the flowers are made, add them to your gifts by using glue dots. That way the gum can still be chewed as an added little bonus present ;)
 
Cute scrapbook paper for leaves and petals, add ribbons and tape... remember be creative!

#shop
#shop
#shop
#shop
#shop

 You can also follow along with Extra Gum on their Facebook for more great holiday ideas!
 
Remember, its not always what you buy, but the little things that are created from your heart that make the holiday season so magical!
 
~Melissa