Melissa Kaylene: creating
Image Map
Showing posts with label creating. Show all posts

Monday, November 10, 2014

A Simple Idea to Give Extra

This shop has been compensated by Collective Bias, Inc. and its advertiser. All opinions are mine alone.
#ExtraGumMoments gum craft ideas #shop #cbias

Being that it is November, I've been reflecting a lot lately about everything that I’m grateful for. I know it’s something that we should think about more than just one month out of the year, but I’m glad that we can all take this time out of the year to think about all of the reasons why we should be happy, instead of all of the reasons why we shouldn't, and it makes me want to give extra joy to the ones I love.

Life is such a precious gift that can be taken away or cut short at any point in time, and I never want anyone to forget just how important they are in my life and how much they mean to me – especially my husband. I don’t know about you, but my spouse is probably the one person that should deserve some extra attention from me, but that doesn’t always happen. Life happens and the ones who are always there for us get put on the back burner until things cool down – and that’s okay to do sometimes, as long as you let them know that they are still in your thoughts, and so with the crazy week I had last week I wanted to make sure Wayne knew I was thinking of him.

#ExtraGumMoments gum craft ideas #shop #cbias

Hence my Extra-Special card concept was born.  This is the guy that took me in when I was probably at the lowest scariest point in my young life and gave me a home and a shoulder to lean on.  He deserves a little Extra surprise every now and then.

#ExtraGumMoments gum craft ideas #shop #cbias

Making a creative card is just one way you can make extra moments that will bring a smile to someone’s face and make them feel happy inside. Remind them of how thankful you are!

I used a blank card that I had lying around and then taped the pack of Extra gum to the front and wrote my wording around it, then added some extra pieces inside with the words “I Love You” for him. I hid it in his lunch box for a surprise while at work, but you could get creative and place your card in other spots, like on the seat in his car, on the bathroom mirror, or even hidden in the mailbox when he checks it. 


#ExtraGumMoments gum craft ideas #shop #cbias

What kinds of things do you do to make your loved ones feel Extra-special? Here's one more idea that I created last winter. 

Thanks #CollectiveBias for letting me share my #ExtraGumMoments with you! 

~Melissa
Follow along for more Extra Gum Moments on  Facebook and Twitter. 

Monday, May 5, 2014

Playing Pretend

Willamette Valley Wonder Woman // #PretendWear @melissakaylene

Last week we had a little coloring fun with markers, paints and outfits that Pretend Wear sent us to try out. The play clothes can be washed and recolored again, letting the kids create colorful creations multiple times. Emma and Noah had a blast. They were SO excited to try on their wearable artwork, and we had a lot of fun spending time together... and finished our painting right before the rain arrived. :)

~Melissa 
I was given free product but was in no way compensated for this post. All opinions are of my own. 

Wednesday, February 12, 2014

Easy D.I.Y. Valentine Cards

Easy DIY Valentine Cards

Hello to all of the last minute crafters out there! Don't tell me I'm the only one, right? I know it would be so much simpler to go and buy a few boxes of Valentine cards for the kids to take to their class parties, but I guess I just have to do things the hard way around here. The past couple of days (okay and mostly this evening) Anika and I were busily creating 66 of these little hearts for three different classrooms.

Easy DIY Valentine Cards

I had actually purchased this red glittery wrapping paper from Costco a couple of years ago during the holidays and have never used it all up...and then while I was putting Christmas stuff away it dawned on me; Valentine Hearts. Of Course! 

Easy DIY Valentine Cards

The Kraft paper was also a score from the Target clearance section. I think it was like 3 rolls for $3.00 or some sort of offer like that I couldn't refuse...and I seem to have this thing for polk-a-dots.

Easy DIY Valentine Cards

So here's what you need:

  1. Photo Paper. I used HP Photo 5X7 photo cards
  2. Glue Dots, or a Glue Stick
  3. Kraft Paper
  4. Red (preferably glittery!) Wrapping paper or scrapbook paper
  5. scissors and /or a fancy dancy paper cutter
  6. Black Washi Tape (optional)
  7. White Chalk Marker (optional)

Easy DIY Valentine Cards

First I created a heart template and folded it in half. I then traced the half hearts onto the back of the glitter paper. I created a whole row and then cut them out. The great thing about this wrapping paper is that its got the grid on the back and it makes it so much easier to fold and align things.

Easy DIY Valentine Cards

I then took my photo cards and folded then in half, then cut each card into two pieces. You could use a card stock instead if you want, I just had the photo cards on hand already, and then were a great size for the least amount of cutting possible. :)

Easy DIY Valentine Cards

I then measured and cut the craft paper to fit just inside the photo paper, then using glue dots I attached everything together. We did end up running out of the glue dots so we switched to a glue stick and that worked just fine.

Easy DIY Valentine Cards

When I glued the hearts, I just glued along the folded line, leaving the edges free to create more of a three dimensional look. This also came in really handy because we bought a big bag of Sweetarts and you can staple the candy to the back of the card and put the staple underneath the side of the heart... so you don't even see the staple. Anika thought this was "such a great idea Mom!"  Sometimes my brain still works. :)

Easy DIY Valentine Cards

So where does the Washi Tape and chalk marker come in? Unfortunately I didn't get pictures of them finished with candy and labeled, but what we did after we stapled the candy off to one side of the back was cut two Washi tape strips and stick them on to the back of the card and then Anika used the chalk marker to write To and From names. It actually turned out really cute!

Easy DIY Valentine Cards

And that's our crazy last minute D.I.Y. Valentine cards!

~Melissa

Sunday, November 24, 2013

"Extra" Special Gift Wrap With Gum

I am a member of the Collective Bias® Social Fabric® Community. This shop has been compensated as part of a social shopper insights study for Collective Bias and it's advertiser. #GiveExtraGum #Shop
 
#shop
 
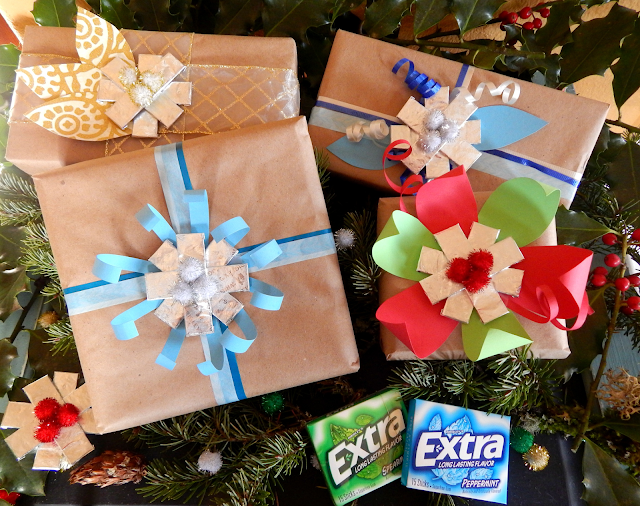
I love gifts that go a little above and beyond and have a little Extra personal touch to them. I wanted to do something like that this year for some of my loved ones, but I wasn't quite sure what to do. I've painted packages, added little ornaments, pretty bows and ribbons, but then one idea dawned on me when I was in the isle at Walmart one afternoon.
 
Gum.
 
Yup. Extra gum.
 
#shop
 
What about making little snow flowers out of them? It's affordable, really quick and easy, and creative.  My kids (who absolutely love chewing gum) thought the idea was fabulous and had so much fun helping me decorate some presents.
 
#shop
#shop
 
These really are so simple to make and make a great statement.
 
#shop
#shop
 
What You Need:
 
1 package of Extra sugar free gum (makes three snow flowers)
 
Glue Dots
 
Pom Poms
 
Washi Tape
 
Curling Ribbon
 
Assortment of scrapbook paper
 
Kraft Wrapping Paper
 
Anything else you'd like to decorate with!
 
#shop
 
 1. Carefully attach a glue dot on the back side of the gum, sealing the wrapper together.
 
2. Attach to second stick of gum
 
3. Continue to add glue dots and gum sticks until all five sticks are stuck together
 
4. Using glue dots attach pom poms to top of the snow flower and
 
Viola!

#shop
 
After the flowers are made, add them to your gifts by using glue dots. That way the gum can still be chewed as an added little bonus present ;)
 
Cute scrapbook paper for leaves and petals, add ribbons and tape... remember be creative!

#shop
#shop
#shop
#shop
#shop

 You can also follow along with Extra Gum on their Facebook for more great holiday ideas!
 
Remember, its not always what you buy, but the little things that are created from your heart that make the holiday season so magical!
 
~Melissa

Sunday, October 27, 2013

3 Last Minute Halloween Decoration Ideas

This post is part of a social shopper marketing insight campaign with Pollinate Media Group™ and Cottonelle, but all my opinions are my own. #pmedia #CottonelleTarget  http://cmp.ly/3/8vNxcO.

     I don't know about you, but this year Halloween has totally crept up on me way to fast. Have you ever found yourself sitting down and looking at the calendar and realizing that you only have a couple days until the big event!?

     Me too.

     It may sound like an odd source to use, but I have got to tell you, in a pinch for last minute Halloween decorations there is one thing we all have in our houses that can be used: Toilet Paper. I happened to buy an extra package at Target the other day so I could create some cheap decorations to share!

     I came up with a few examples on things you can quickly create (and have the kids help with) so you can spook up your house before the ghosts and goblins arrive.


#1 Ninja Pumpkins

Have some bare pumpkins? No fear! Ninja pumpkins are super easy to create and can be colored any way you'd like. All it takes is some Cottonelle toilet paper!

What you need:
  • 1 triple roll of Cottonelle toilet paper
  • Sharpie marker ( I used black, but you could use blue, red, etc.)
  • tape
Unroll a long strip of toilet paper (depending on the size of the pumpkin) and start twisting it into a rope. Once the strip is all twisted (it doesn't have to be perfect!) tape one end to the back of the pumpkin and wrap around until you have created a mask. Then color the ninja eyes on a viola'! instant Ninja mask.

 #2 Ghost Garland
This Garland is so fun to make with the kids! And you literally only need a couple things to create it.

What you need:
  • 1 Triple Roll Cottonelle toilet paper
  • 1 Black Sharpie Marker
  • 1 orange highlighter
  • Needle and Thread

Start by figuring out how long you want your garland to be. Mine shown is approximately 4 feet.
Begin by tearing off 6 square sheets at a time. You will need 2 sets of 6 squares per ghost.
Take one set of squares and crumple them up into a ball. Then place that ball into the middle of the other set of squares. Tie off with thread to create the ghost head. Then draw a face on with a sharpie.
Continue the process until you have the number of ghosts you would like.
Then, take three individual squares of toilet paper and fold them in half to create the center letters. Write on them and then outline with orange marker (or decorate however you would like!).
Next you will need to thread a needle. For this project I doubled the thread up to make it a little thicker, but you could also use yarn to hang them with.
Thread each ghost on through the top of their heads so they stay on securely, and then just stitch through the lettering twice.
Next just figure out where to hang it! Indoors ideally if the weather looks a little iffy for the night, but if all is dry outdoors, hang it on the porch for all to see!


#3 Bloody Mummy Window

The kids had a lot of fun with this one!

What you need:
  • 1 Triple roll Cottonelle toilet paper
  • 1 roll masking tape (or any kind of paper tape)
  • Red and black dry erase markers or window markers

Pick a window that your trick-or-treaters will see! From the inside of the window measure the width and tear off sheets of toilet paper to cover horizontally. Crumple the toilet paper up a little with your hands then straighten out to give it a wrinkled mummy wrap look. Tape each side to the window and continue until you have covered the inside of the window. Then, take two strips of toilet paper and color red circles for eyes. Tape them on the inside in between two strips.

Next on the outside of the window you can let the fun begin. Using a dry erase marker, or window marker, let the kids have at it coloring blood and tracing their hands to create a bloody mummy show for their friends to see!


 Have you ever made something creative using toilet paper? I'd love to hear! Also, right now if you're shopping at Target you can download a coupon for a FREE box of Kleenex tissue with the purchase of a package of Cottonelle Triple Roll 12 pack (or larger) HERE. *While supplies last* :)
Happy last minute decorating!

~Melissa